Using sol
this section describes the different views available in the main sol gui

here is what the main view in sol looks like.
at the very top is the menu bar, from which you can edit settings, save/load your library, import clips, change views, etc.
at the top you have 2 (however many layers you want) clip controls.

at the top of each clip control is the clip name, double click to rename.
below are the main controls, the playback buttons are self explanatory, the X clears the corresponding layer. the spd and sens sliders allow you to control playback speed or the sensitivity of midi seek control. The +, -, o buttons control the zoom level of the timeline, +/- zoom in & out respectively, o resets zoom, the checkbutton underneath toggles whether or not you want the timeline to automatically scroll with playback.

the QP/LP dual-button toggle switches the action of the pads & the display of the timeline. in QP mode, the pads activate or set cue points on left-click and remove them on right-click. additionally in QP mode, the only indicators on the timeline represent where your cue points are. in LP mode, the pads activate/remove loop points and the timeline also shows how your loop points are laid out.
the loop on button toggles whether or not looping is enabled, the dflt/bnce dual-button toggle is for loop-type, either dflt - default, or bnce - bounce, also called ping pong (plays forwards to end of loop selection, then plays backwards till beginning, plays forwards etc.). the in and out buttons set the currently selected loop range's start and end points to the current playback position. the \/ and /\ buttons let you quickly switch between loop ranges in index order.
the big black bar is the timeline with a medium gray line showing where in playback the clip is at, drag along the black area to seek or use your scrollwheel to scratch. dotted gray lines represent cue points, which correspond to the numbers 0-7 below (8 total = no cue points). clicking on the dotted line or its label will snap the seek to that cue point, right clicking and dragging lets you change the point.
on the bottom left are the three browsers: search, tags, and browse. click the tab name to switch between these.
search lists all clips or lets you search for any clip by name

tags lets you search or browse through clips by tag

browse lets you browse through clips based off of their file location

drag a clip from any of these views onto the clip collection area to add it to the collection, double left- or right-click to activate from within the clip browser

on the right, underneath the clip controls are your clip collections. each clip collection stores 8 clips ( = no cue points). to create a new clip collection hit the + by the scrollbar. click a clip collection label along the bottom to bring it forward, double click a clip collection label to rename it, middle click (or double-right click) to delete it.
for each clip within the clip collection, mouse over to play through the 5 thumbnails (# of thumbs to generate), right click and drag to move to another spot, middle click to clear or double-click to activate. a double left-click activates to the 1st layer, a double right-click activates to the 2nd layer (this is why i recommend 2 layers :v) ).

the point of this view is to quickly create clip collections.
when you enter the clip org view, the main window will shrink to just one clip control.
the clip org window that pops up populates with every clip from your library in a file-hierarchical order, there is a search bar at the top for finding clips by name. double click on a clip to activate it to the 1st layer, or right-click and drag to a clip collection.

the point of this view is to quickly organize your clips or add new ones to your library.
the lib org view also will shrink the main window to just one clip control.
the main lib org window displays the same clip file hierarchy as the browse clip browser.
the import wizard option lets you import clips by folder and perform the same operations as within the main lib org.
you can use the arrow keys to move around, pressing enter or double-clicking will open a clip in your external video player. multiple selection (with shift or ctrl-clicking) is supported for deletion & tagging. the shortcuts at the bottom of the screen are as follows
- DELete : the delete key will remove clips from your library or import queue, not actually deleting them from your hard drive
- Rename : opens up a dialog to rename the file
- Tag : opens a dialog that lets you quickly tag clips with any of the tags already in your library or create new ones
- Move : opens a dialog that lets you move a clip to any other folder where you already have clips or a new one.
select config midi from the menu
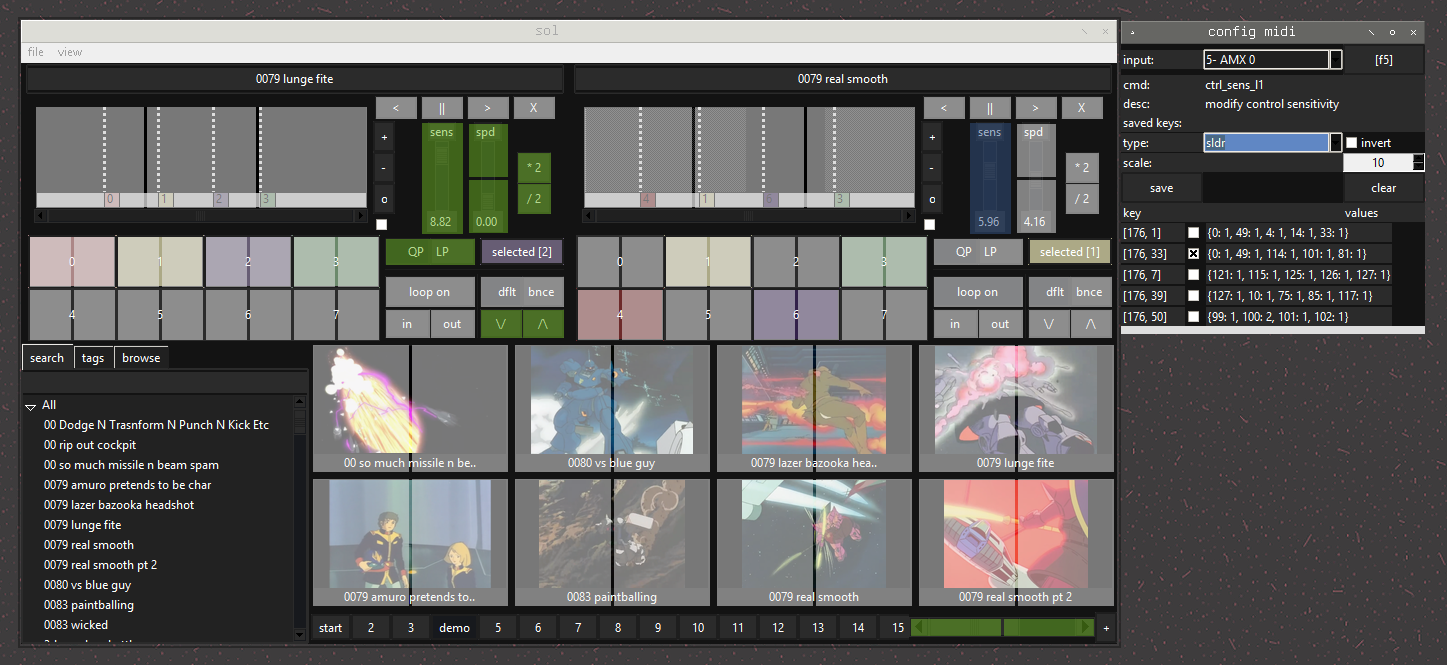 attached to the main gui you'll see the config popup, select your midi device or press [f5] to refresh the list, as you hover over interface elements you'll see their associated command name/description. clicking on a block will let you set a midi key to it, which will be highlighted in blue. elements highlighted in green have midi keys set for the currently selected midi input.
activate the midi control you want somehow (press a button, wiggle a slider, etc.) and the keys will populate, check the box next to the key name if this is the control you want to assign. values displays a histogram of the last 5 key values and their counts, use these to determine what type of key to choose
- togl: simple on/off, 127's and 0's only
- knob: for relative control, more than one of the following: 1, 2, 125, 126
- sldr: for absolute control, all values from 0-127
the invert checkbutton lets you invert the effect of a control, ie a sldr type control will map 0-127 to 1-0.
the scale entry is useful for several relative/absolute controls where you want to control the sensitivity of your input
you can also translate midi messages to osc. see midi2osc.v4p for an example implementation in vvvv
sol expects midi messages at osc address /midi and for them to be formatted as [channel, key, n] and then choose osc as your input in the config
sol_mt is a secondary gui that can run on the same device as sol or on another device on the same network.
to use sol_mt, enable it in the options and set the correct ip address for the client. make sure port 6666 isn't blocked by your firewall.
a sample multitouch client implemented in vvvv can be found in my modjlrr repo under sol_mt.v4p
if you wish to make your own, see extending sol / gui / sol_mt